In the ever-evolving world of website development and content management systems, WordPress remains a leading choice for bloggers, businesses, and developers alike. It’s user-friendly, highly customizable, and offers a plethora of plugins and themes to enhance your website’s functionality and design. If you’re looking to launch a WordPress-powered website, Cloudways is an excellent hosting platform that provides a hassle-free experience, combining the power of cloud infrastructure with ease of use. In this comprehensive guide, we’ll walk you through the step-by-step process of installing WordPress on Cloudways.
Contents
Why Choose Cloudways for WordPress Hosting?
Before we dive into the installation process, let’s briefly explore why Cloudways is an excellent choice for hosting your WordPress website:
- Performance: Cloudways offers a choice of top cloud providers such as AWS, Google Cloud, and DigitalOcean. You can select the provider that suits your needs and budget, ensuring high performance and scalability.
- Managed Hosting: Cloudways provides a managed hosting experience, which means you won’t have to deal with server maintenance tasks. They take care of server management, security updates, and backups.
- Ease of Use: The Cloudways platform is designed with user-friendliness in mind. It offers a user-friendly control panel that makes server and application management a breeze.
- Security: Cloudways offers robust security features, including firewalls, regular security patches, and 24/7 monitoring to protect your website from threats.
- Scalability: As your website grows, Cloudways makes it easy to scale resources up or down according to your needs, ensuring optimal performance at all times.
Now that we’ve highlighted the advantages of using Cloudways for WordPress hosting, let’s get started with the installation process.
How to Install WordPress on Cloudways
01. Signing Up for a Cloudways Account
To begin, you need to sign up for a Cloudways account. Follow these steps:
- Visit the Cloudways website.
- Click on the “Get Started for Free” button.
- Fill in your details, including your name, email address, and password.
- Click “Start Free” to create your account.
You’ll receive a verification email; click the link to confirm your email address and activate your Cloudways account.
02. Creating a New Server on Cloudways
After successfully creating your Cloudways account, it’s time to create a new server to host your WordPress website.
- Log in to your Cloudways account.
- In the Cloudways dashboard, click on the “Launch” button to create a new server.
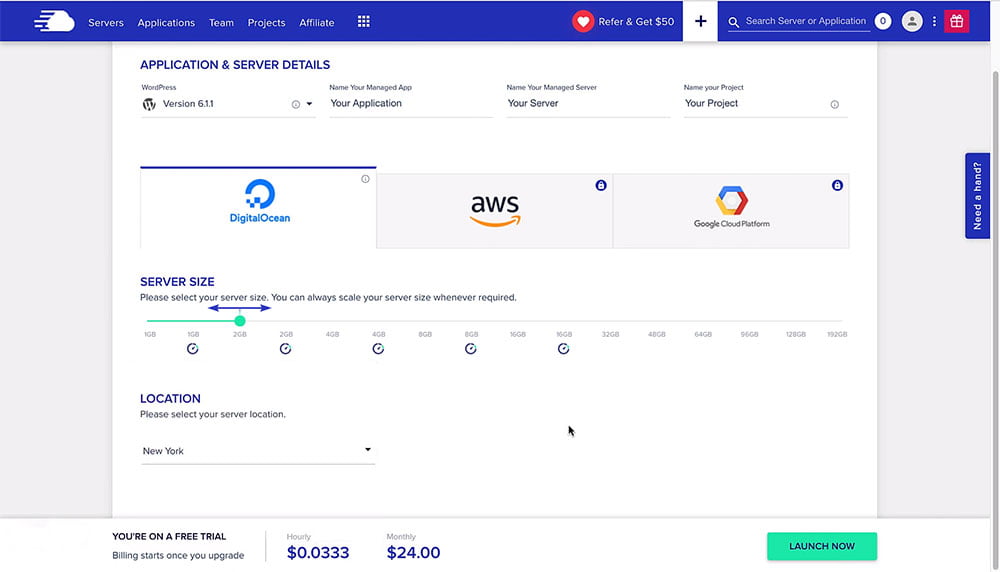
03. Choosing Your Cloud Provider
Cloudways offers a selection of reputable cloud providers. Choose the one that suits your requirements and budget. Popular options include DigitalOcean, AWS, and Google Cloud. And each provider has different prices.
For this example, let’s select DigitalOcean. Click on “DigitalOcean.”

04. Selecting Server Specifications
Next, you’ll need to choose your server specifications. These specifications determine the server’s resources, such as CPU, RAM, and storage.
- Select the server size that aligns with your website’s expected traffic and resource needs. You can start with the smallest plan and scale up later as your site grows.
- Choose the data center location that’s geographically closest to your target audience for improved website speed.
Once you’ve made your selections, click “Launch Now” to create the server.
05. Selecting a Data Center Location
Choosing the right data center location is crucial for minimizing latency and ensuring fast website loading times. Cloudways offers multiple data center locations, so you can pick one that’s closest to your target audience.
- From the available data center options, choose the one that best serves your audience’s geographic location.
- Click “Launch Now” to proceed.
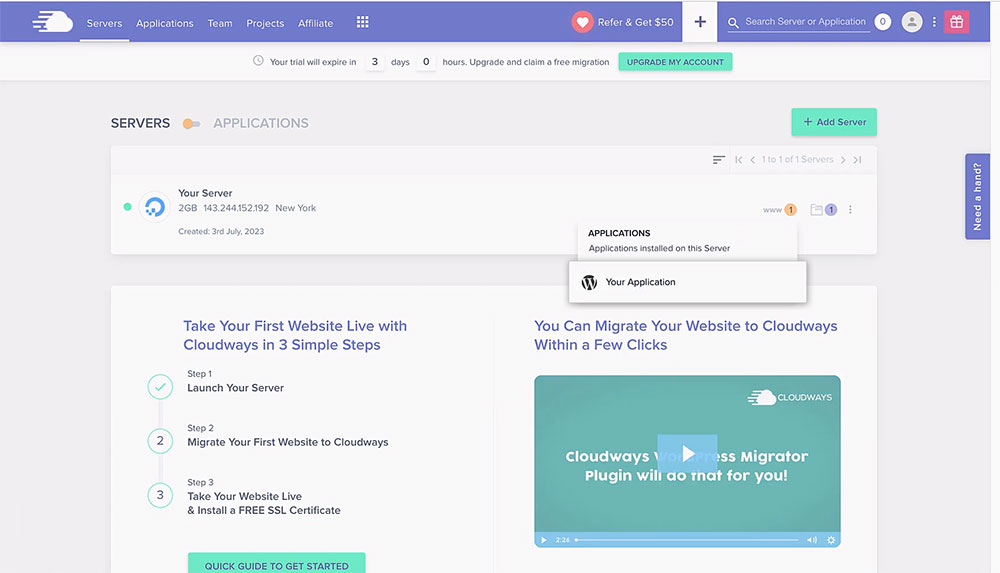
06. Adding an Application (WordPress)
With your server set up, it’s time to add a WordPress application to it.
- In the Cloudways dashboard, navigate to the “Applications” tab.
- Click “Add Application”.
07. Customizing Your WordPress Installation
Now, you’ll configure your WordPress application.
- Choose “WordPress” from the list of available applications.
- Provide a name for your application, such as the name of your website.
- Set the project name (optional) for organizational purposes.
- Choose the server you created earlier from the drop-down menu.
- Leave the “Public Access” option enabled.
- Set your application credentials, including the admin username and password. These will be used to log in to your WordPress dashboard, so ensure they are secure.
- You can also choose to install a free WordPress cache plugin, such as Breeze, to improve your website’s performance.
Once you’ve filled in all the necessary details, click “Add Application.”
08. Setting Up Domain and SSL
At this point, your WordPress application is installed, but it’s not accessible via a domain name, and it lacks SSL security. Let’s address these issues:
- In the Cloudways dashboard, go to the “Application Management” section.
- Click on your WordPress application’s name to access its settings.
Configuring Domain Name:
- Under the “Domain Management” section, click on the “Add Domain” button.
- Enter your domain name and click “Save Changes.”
Setting Up SSL:
SSL (Secure Sockets Layer) is essential for encrypting data between your website and its visitors. Cloudways provides an integrated Let’s Encrypt SSL feature for free.
- In the same “Domain Management” section, find your domain name.
- Click on the “Let’s Encrypt” button next to your domain name.
- Wait for the SSL certificate to be installed. This usually takes a few minutes.
Configuring DNS:
After setting up your domain and SSL, you’ll need to configure your domain’s DNS settings to point to your Cloudways server. This process depends on your domain registrar, so follow the instructions provided by your registrar to update your DNS records.
Managing WordPress on Cloudways
Once your domain is configured and SSL is in place, you can manage your WordPress website through the Cloudways dashboard. Here are some key management tasks you can perform:
- Accessing Your WordPress Dashboard: To access your WordPress admin dashboard, click on the application name in the Cloudways dashboard and select “Admin Panel.”
- Installing Themes and Plugins: Customize your website by installing themes and plugins. Navigate to the WordPress dashboard, go to “Appearance” for themes, and “Plugins” to add new plugins.
- Backups and Restore: Cloudways provides automated backup options. You can create manual backups or schedule them as needed. In case of any issues, you can restore your website to a previous state.
- Scaling Resources: As your website grows, you may need to scale your server resources. Cloudways makes it easy to scale resources up or down according to your needs. You can do this directly from the Cloudways dashboard. Here’s how:
- Log in to your Cloudways account.
- In the dashboard, select the server where your WordPress application is hosted.
- Under the “Server Management” section, click on “Vertical Scaling.”
- Adjust the CPU, RAM, and storage to meet your website’s requirements.
- Click “Apply” to save your changes.
Cloudways also offers a number of advanced features for managing your WordPress website, such as:
- Staging Environments: Create a staging environment to test changes, updates, or new features before deploying them to your live website.
- Server Monitoring: Keep an eye on your server’s performance, including CPU usage, memory, and storage, to ensure optimal performance.
- Server Cloning: Easily duplicate your server and application for development or testing purposes.
- SSH Access: If you’re a developer, you can use SSH access to directly access and modify your server.
- Application and Server Backups: Create on-demand backups of your WordPress application and server to ensure data security and quick recovery in case of any issues.
Optimizing Your WordPress Website on Cloudways
After installing WordPress on Cloudways, it’s essential to optimize your website for performance and security. Here are some optimization tips:
- Install a Caching Plugin: While Cloudways provides server-level caching, you can further optimize your website’s speed by using a WordPress caching plugin like WP Super Cache or W3 Total Cache.
- Content Delivery Network (CDN): Implement a CDN to distribute your website’s content across multiple servers worldwide, reducing load times for users in different geographic locations.
- Security Plugins: Enhance your website’s security by installing security plugins like Wordfence or Sucuri Security. These plugins help protect your site from malware, brute-force attacks, and other security threats.
- Regular Updates: Keep your WordPress core, themes, and plugins up to date to ensure they’re equipped with the latest security patches and features.
- Image Optimization: Use image compression plugins like Smush or ShortPixel to reduce the file size of images on your site, improving loading times without sacrificing quality.
- Database Optimization: Use a plugin like WP-Optimize to clean up and optimize your WordPress database for improved performance.
- SEO: Implement an SEO plugin like Yoast SEO to optimize your content for search engines and improve your website’s visibility in search results.
- Mobile Responsiveness: Ensure that your WordPress theme is mobile-responsive to provide a seamless experience for users on smartphones and tablets.
- Regular Backups: Configure automated backups to ensure you can quickly restore your site in case of data loss or security incidents.
- Monitoring and Analytics: Use tools like Google Analytics and Google Search Console to monitor your website’s traffic and performance, enabling data-driven decision-making.
- Content Strategy: Develop a content strategy and create high-quality, engaging content that resonates with your target audience.
Conclusion
In this comprehensive guide, we’ve walked you through step-by-step How to Install WordPress on Cloudways, a powerful and user-friendly hosting platform that combines the benefits of cloud infrastructure with managed hosting services. With Cloudways, you can enjoy the performance, scalability, and security needed to run a successful WordPress website. In addition, it provides free migration of your site
Remember that after the installation process, ongoing management and optimization are crucial for maintaining a high-performing and secure WordPress website. Regularly update your plugins and themes, monitor your website’s performance, and implement security best practices to ensure your site remains in top shape.
By following the steps outlined in this guide and implementing the optimization tips provided, you’ll be well on your way to creating a WordPress-powered website that not only meets but exceeds your goals and expectations. Embrace the flexibility and power of WordPress on Cloudways, and watch your online presence thrive.


